> ## Documentation Index
> Fetch the complete documentation index at: https://sequence-0fb8d9e6-6256-forte-config.mintlify.site/llms.txt
> Use this file to discover all available pages before exploring further.

# Embedded WalletのStytch設定

> Embedded WalletインスタンスでStytchクライアントを設定する方法を説明します。StytchダッシュボードでPublic Tokenを作成・取得する手順に従ってください。

Embedded WalletインスタンスにStytch認証を統合するには、[Stytch Dashboard](https://stytch.com/dashboard)でStytchアプリケーションを設定し、[Sequence Builder](https://sequence.build/)でEmbedded Walletを設定します。以下の手順から始めてください：

<Warning>
  Stytch認証は現在アーリーアクセス中です。有効化するには、[https://sequence.build/earlyaccess](https://sequence.build/earlyaccess) にアクセスし、機能をオンにしてください。
</Warning>

<Steps>
  <Step title="サインアップ / サインイン">
    まず[サインインページ](https://stytch.com/dashboard)にアクセスします：
  </Step>

  <Step title="プロジェクトの作成">
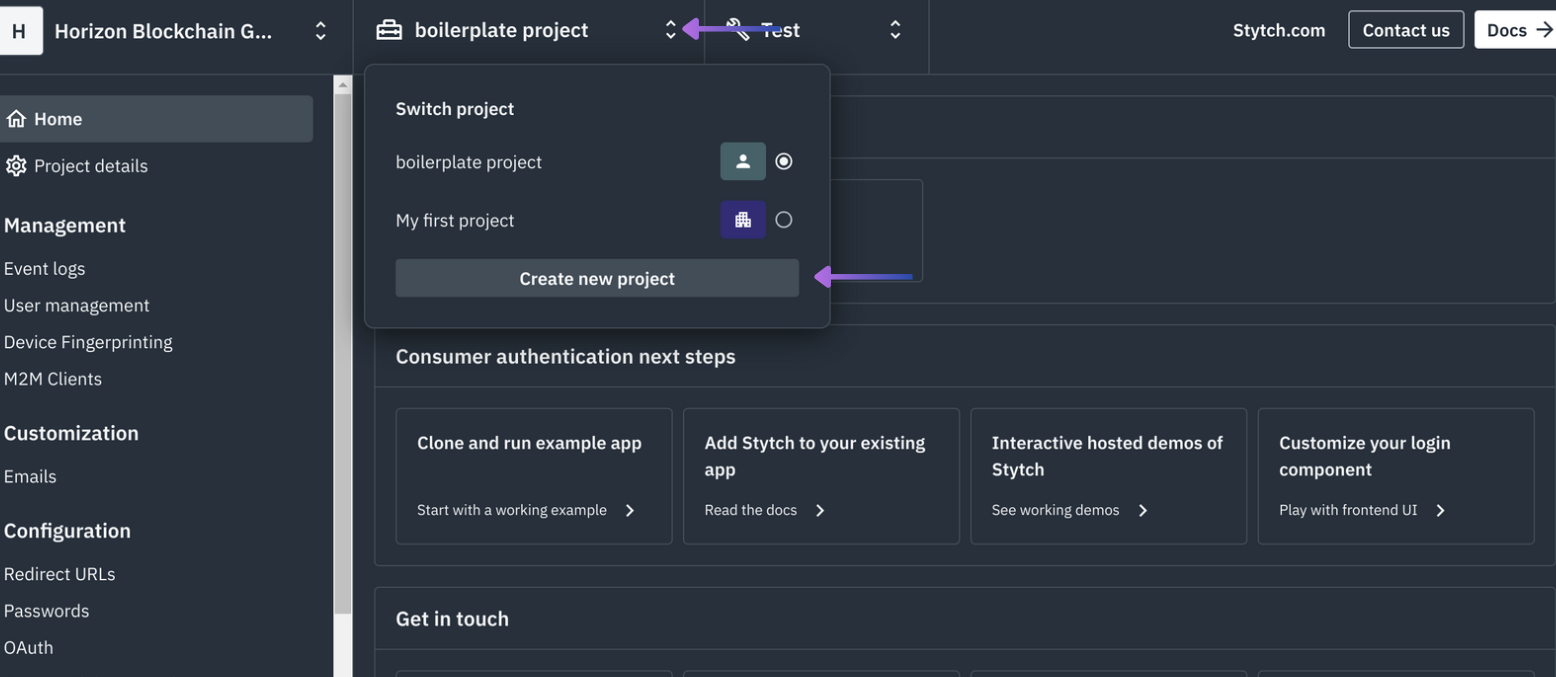
    サインイン後、プロジェクト一覧のドロップダウンから`Create new project`を選択します：

    <Frame>
      <img src="https://mintcdn.com/sequence-0fb8d9e6-6256-forte-config/IbBJiYO_cOthjk5Y/images/builder/stytch_create_new_project.png?fit=max&auto=format&n=IbBJiYO_cOthjk5Y&q=85&s=046878cc4f5aec87065e7b5d31b58026" alt="プロジェクトの作成" width="1556" height="677" data-path="images/builder/stytch_create_new_project.png" />
    </Frame>

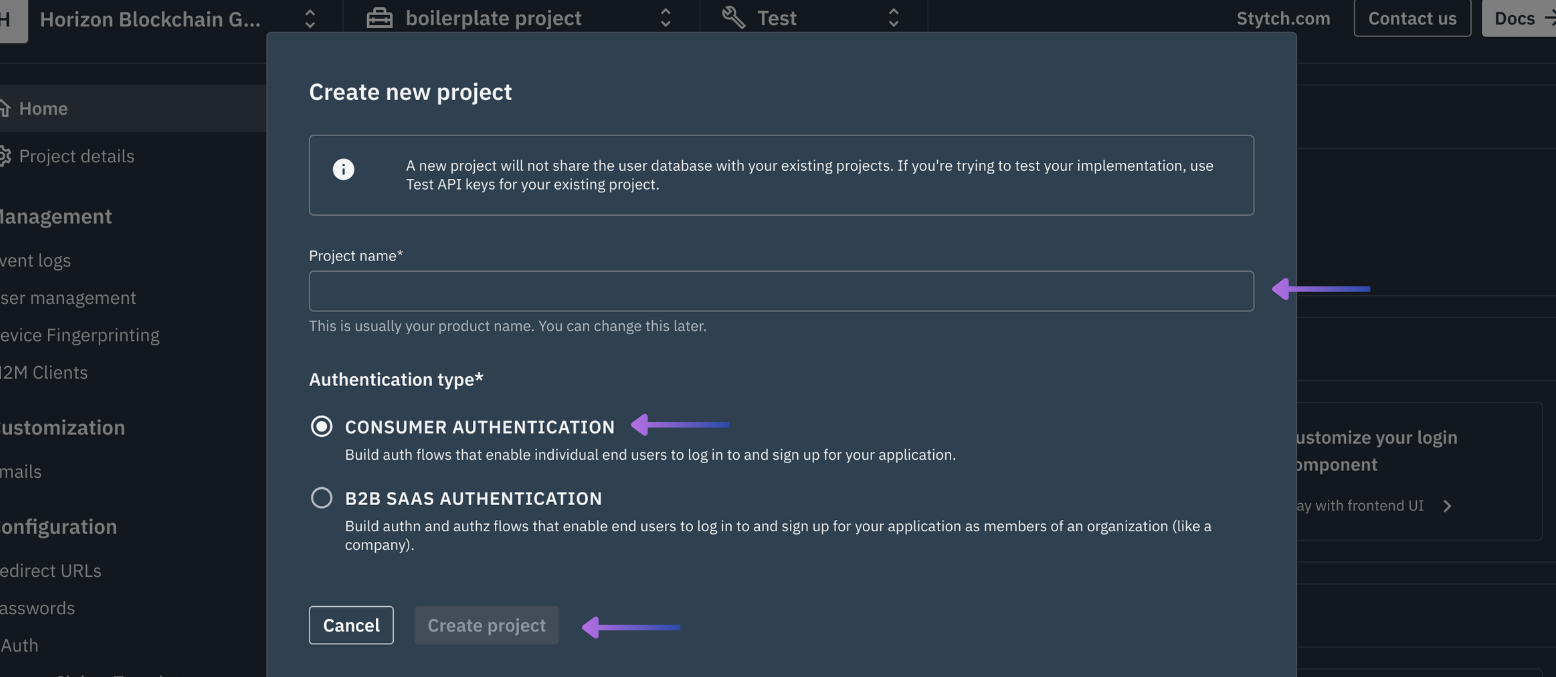
    次に`CONSUMER AUTHENTICATION`を選択します：

    <Frame>
      <img src="https://mintcdn.com/sequence-0fb8d9e6-6256-forte-config/IbBJiYO_cOthjk5Y/images/builder/stytch_create_project.png?fit=max&auto=format&n=IbBJiYO_cOthjk5Y&q=85&s=969a2ec3c080583776225d94ad7601cf" alt="新規プロジェクト作成" width="1556" height="677" data-path="images/builder/stytch_create_project.png" />
    </Frame>

    最後に`Create project`を選択します。
  </Step>

  <Step title="Stytch Project IDとStytch Public Tokenの取得">
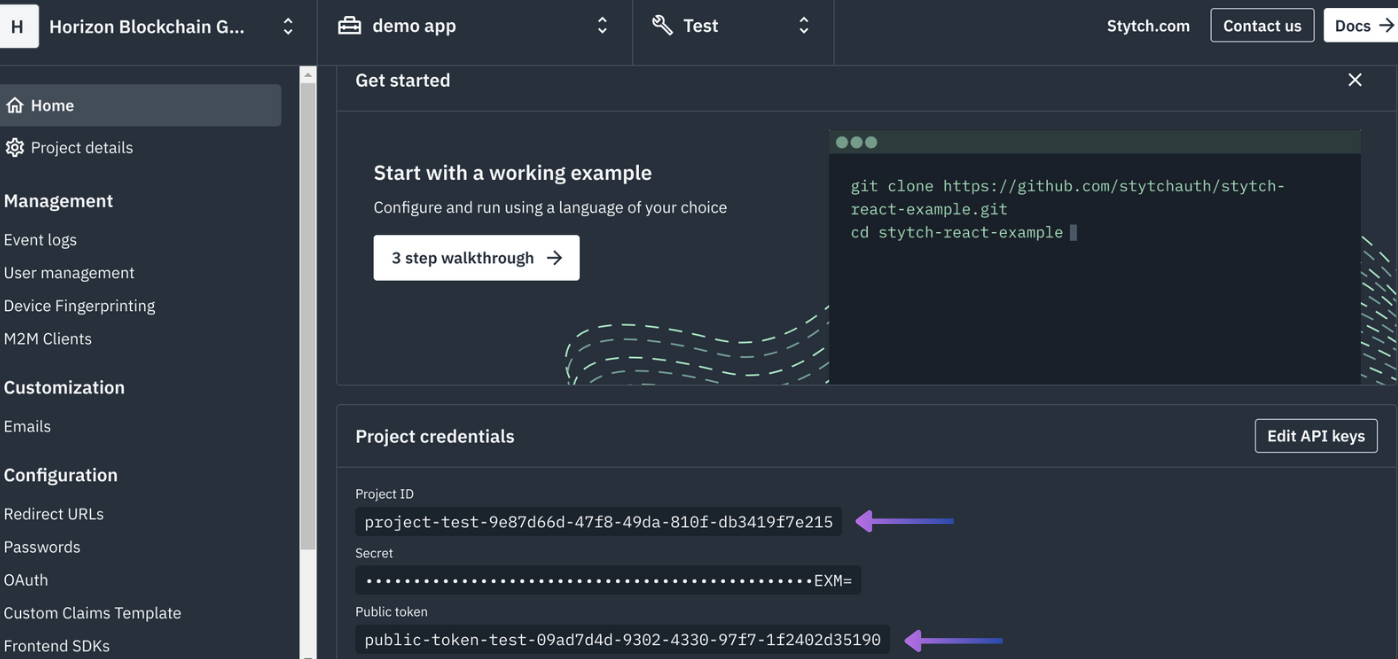
    `Home`の最初の画面下部から`Stytch Project ID`と`Stytch Public Token`をコピーし、安全な場所に保存してください。
    <Frame>
      <img src="https://mintcdn.com/sequence-0fb8d9e6-6256-forte-config/IbBJiYO_cOthjk5Y/images/builder/stytch_obtain_keys.png?fit=max&auto=format&n=IbBJiYO_cOthjk5Y&q=85&s=582805bce65f5717abe0a993f263f97e" alt="Project IDとStytch Public Tokenの取得" width="1398" height="659" data-path="images/builder/stytch_obtain_keys.png" />
    </Frame>
  </Step>

  <Step title="リダイレクトURLの更新">
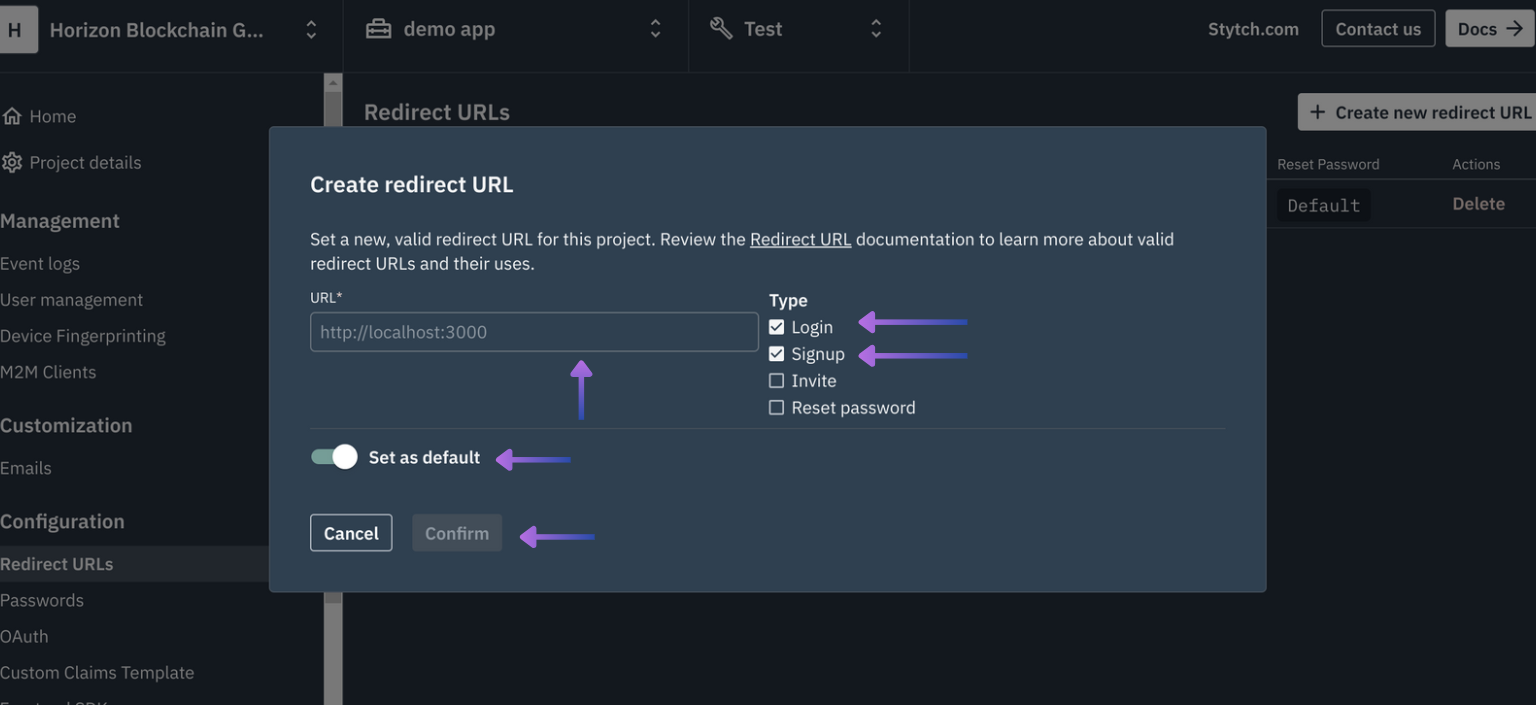
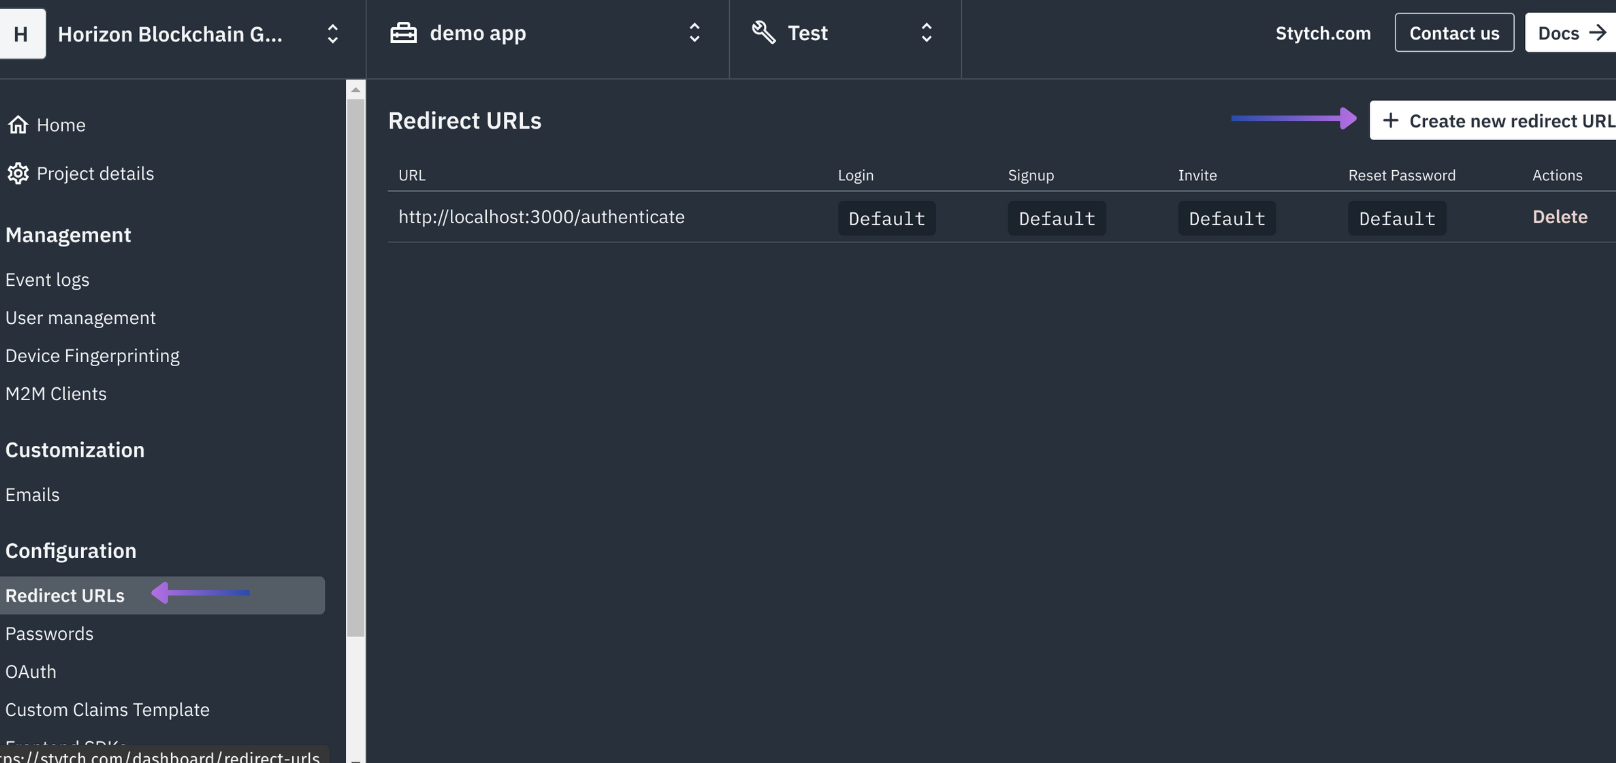
    ローカル開発の場合は`http://localhost:4444/authenticate`をご利用ください。
    <Frame>
      <img src="https://mintcdn.com/sequence-0fb8d9e6-6256-forte-config/IbBJiYO_cOthjk5Y/images/builder/stytch_create_new_redirect_uri.png?fit=max&auto=format&n=IbBJiYO_cOthjk5Y&q=85&s=1a4b31a4e6b6f1f9e06113734fa1e8fb" alt="リダイレクトURLの更新" width="1616" height="763" data-path="images/builder/stytch_create_new_redirect_uri.png" />
    </Frame>

    `Login`と`Register`を有効にし、`Set as default`を選択して`Confirm`をクリックします：

    <Frame>
      <img src="https://mintcdn.com/sequence-0fb8d9e6-6256-forte-config/IbBJiYO_cOthjk5Y/images/builder/stytch_create_new_redirect_uri_confirm.png?fit=max&auto=format&n=IbBJiYO_cOthjk5Y&q=85&s=73e12758066e8f8c78c5a76adcbd804f" alt="Project IDの取得" width="1536" height="705" data-path="images/builder/stytch_create_new_redirect_uri_confirm.png" />
    </Frame>
  </Step>

  <Step title="SDKの許可オリジンを更新">
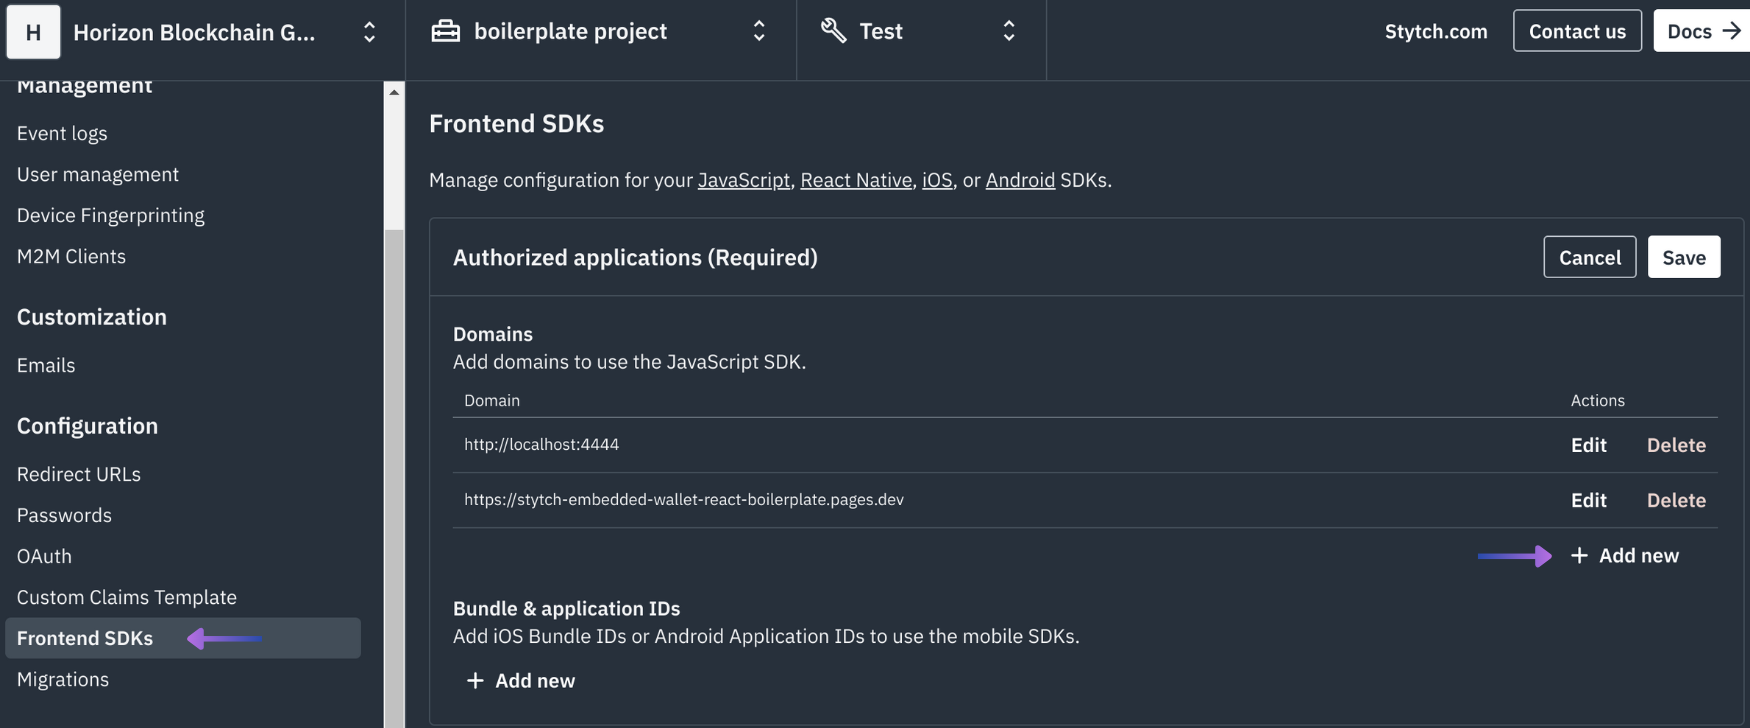
    ローカル開発の場合、ご自身の開発用URL（例：`http://localhost:4444`）が正しく設定されていることを確認してください。

    <Frame>
      <img src="https://mintcdn.com/sequence-0fb8d9e6-6256-forte-config/IbBJiYO_cOthjk5Y/images/builder/stytch_add_url_to_sdk.png?fit=max&auto=format&n=IbBJiYO_cOthjk5Y&q=85&s=fb566bcaf1a0716e2644905d3765fd0d" alt="SDK用URLの更新" width="1750" height="728" data-path="images/builder/stytch_add_url_to_sdk.png" />
    </Frame>
  </Step>

  <Step title="Sequence Builderでの設定">
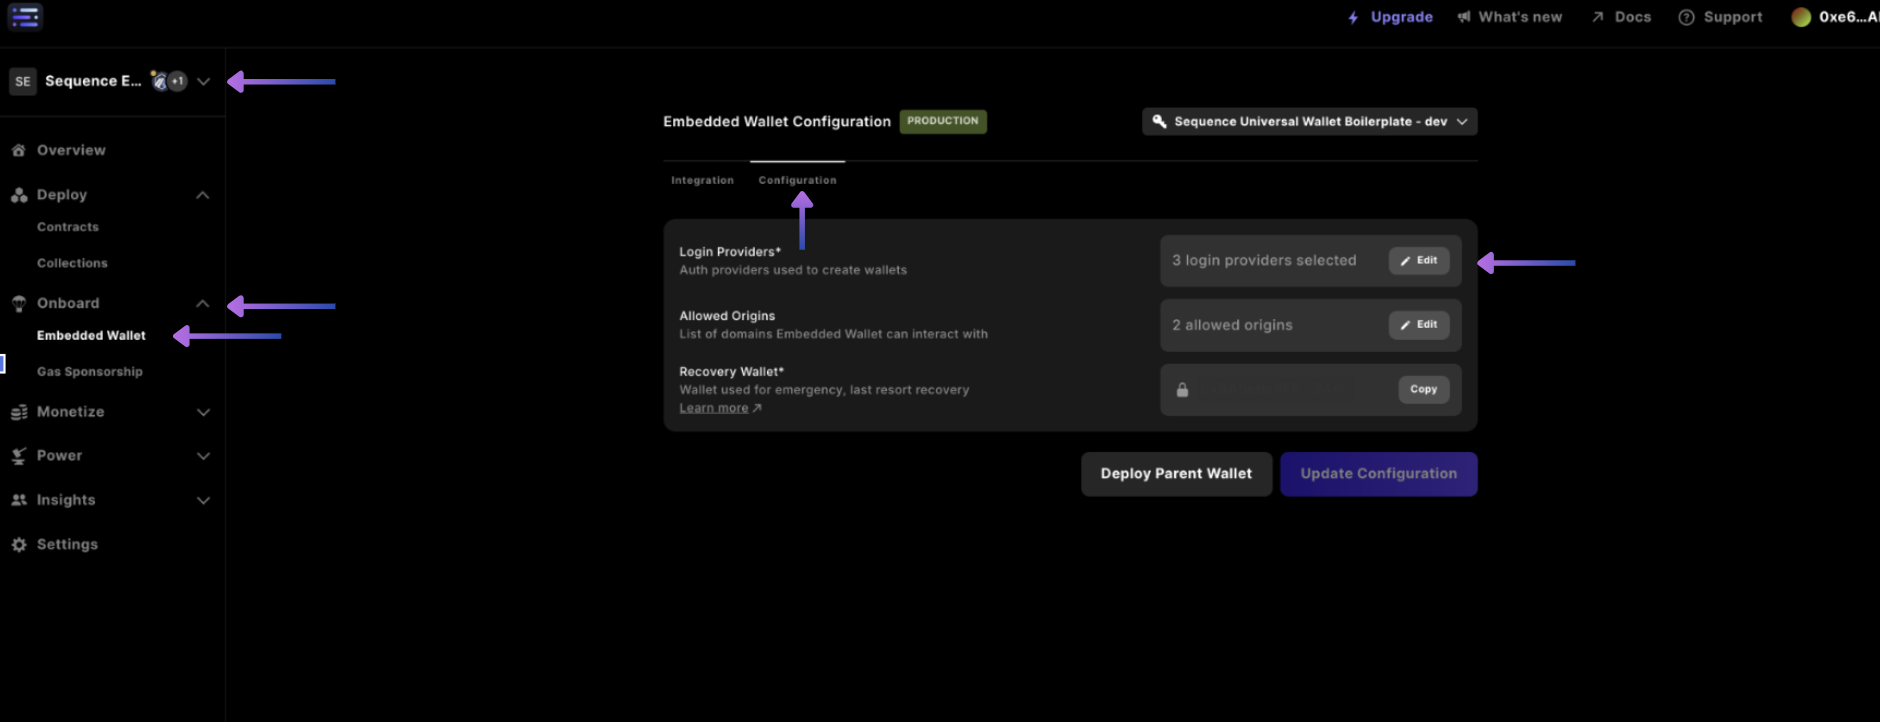
    次に、Sequence Builderでプロジェクトにアクセスし、Embedded Wallet設定セクションでログインプロバイダーを追加してStytch認証を有効にします：

    <Frame>
      <img src="https://mintcdn.com/sequence-0fb8d9e6-6256-forte-config/UgfzLfoB-6G0OI5_/images/builder/builder_stytch_add_provider.png?fit=max&auto=format&n=UgfzLfoB-6G0OI5_&q=85&s=de8a0930292604bceb82c8acde8c3d76" alt="ログインプロバイダーを追加" width="1880" height="722" data-path="images/builder/builder_stytch_add_provider.png" />
    </Frame>

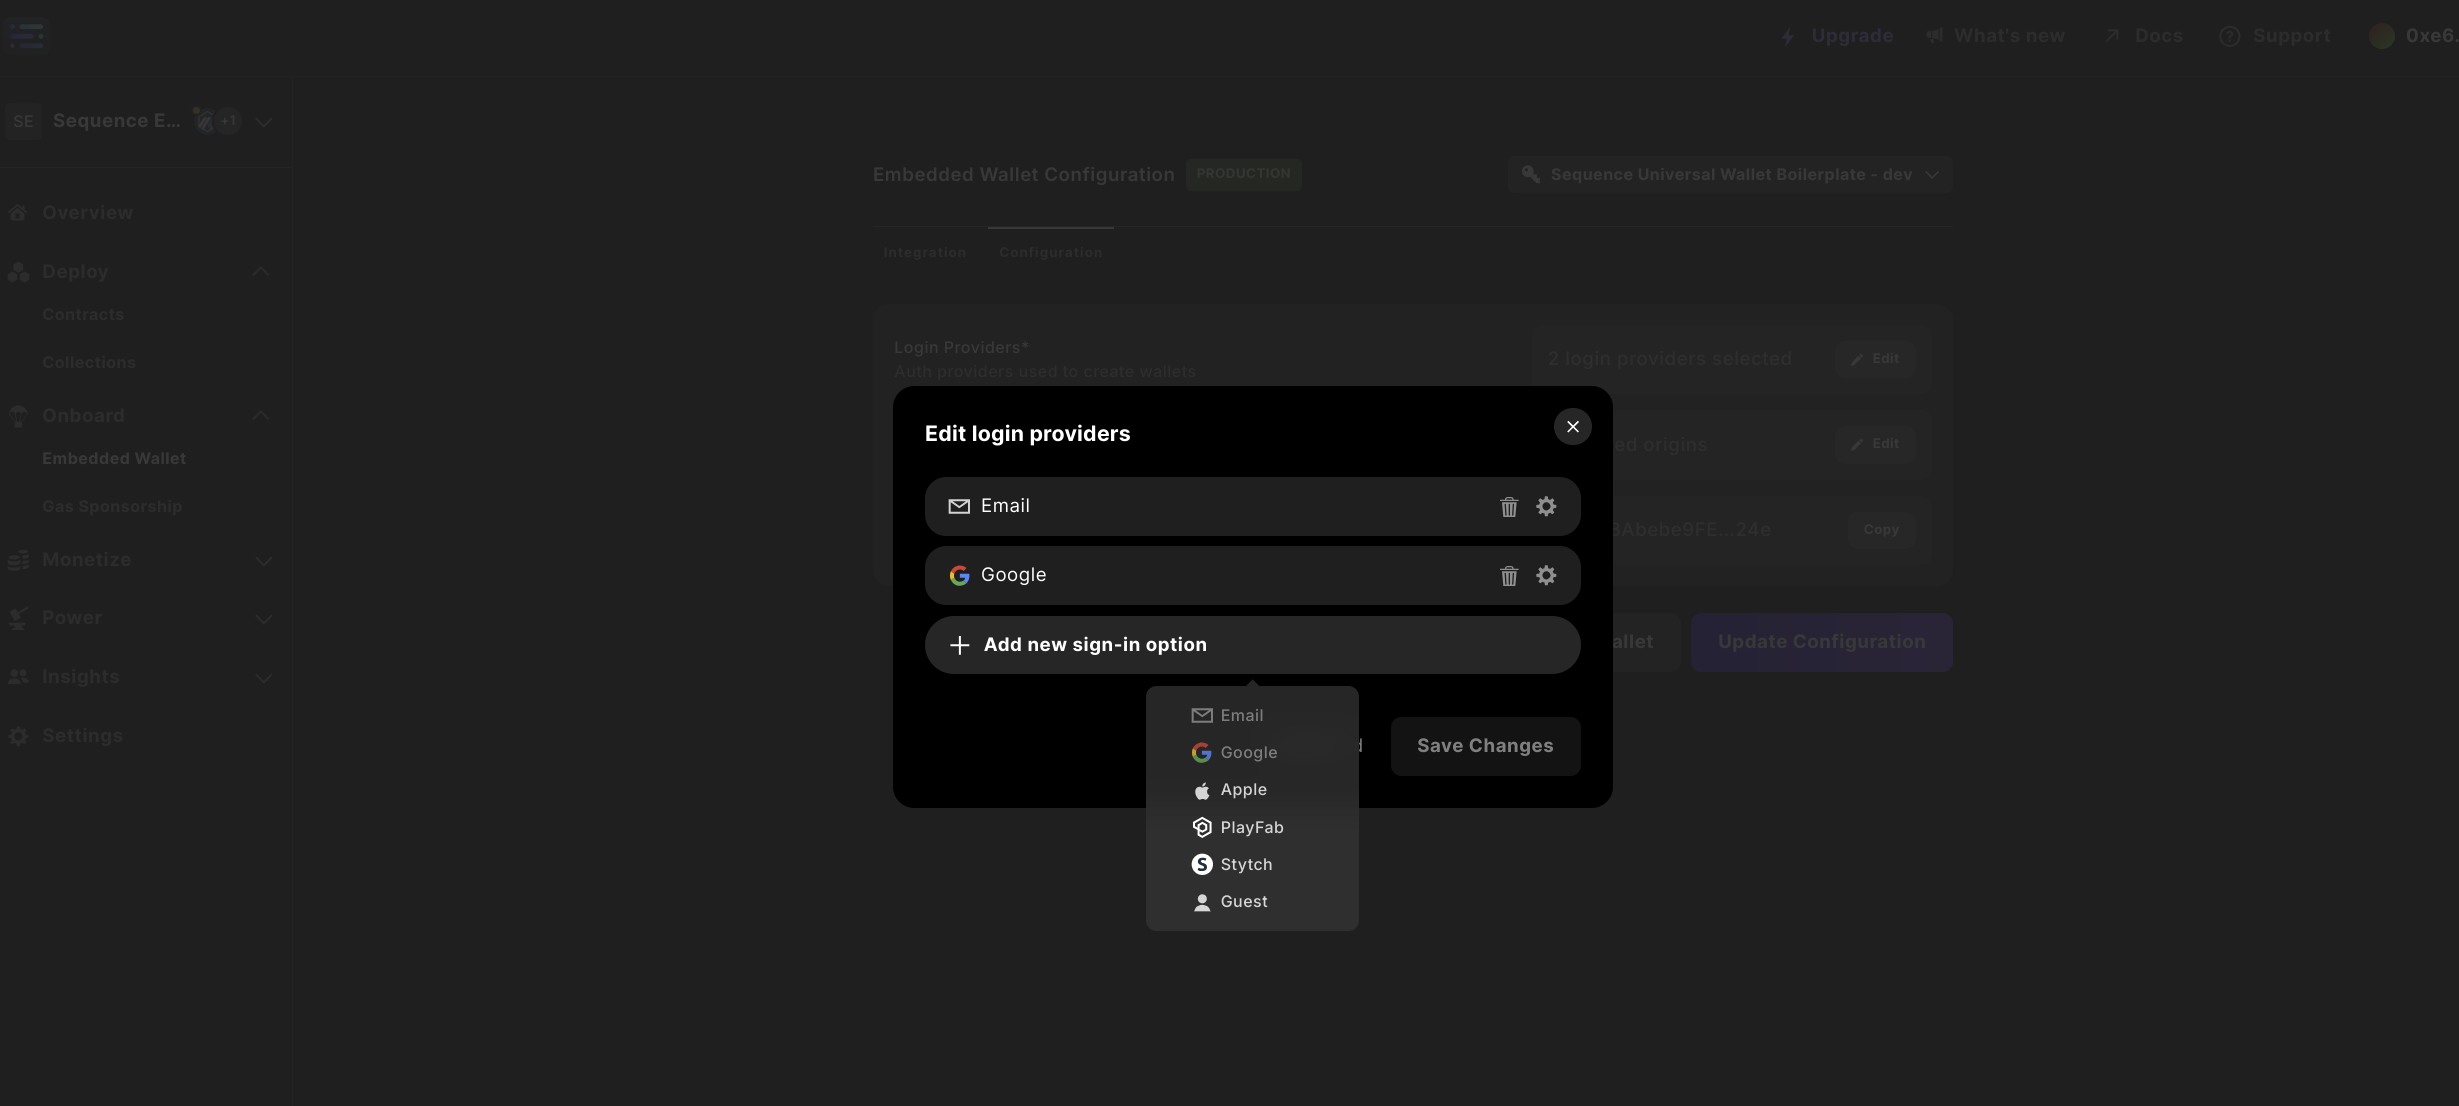
    最後に、ドロップダウンから`Stytch`を選択します。

    <Frame>
      <img src="https://mintcdn.com/sequence-0fb8d9e6-6256-forte-config/UgfzLfoB-6G0OI5_/images/builder/builder_stytch_select_provider.png?fit=max&auto=format&n=UgfzLfoB-6G0OI5_&q=85&s=66300b59ca8099247d845b20f957904a" alt="Stytchを選択" width="2459" height="1106" data-path="images/builder/builder_stytch_select_provider.png" />
    </Frame>

    `Stytch Project ID`を入力し、`Save changes`を選択してから、紫色の`Update configuration`を選択し、パスワードを入力して設定を更新します。
  </Step>
</Steps>